


I bought a rather expensive card but it was in a really bad state. Doing an alter usually means masking all that up. I've already done this card's extended borders in the past and I was struggling with it A LOT. So what I wanted to learn?
- how to mix the right color, in this case I decided to go with a basecoat in grey and then 'color' the cards background in shades of that grey (which unfortunately was with hints of green----).
- how to get rid of paint from the name and type of the card (also meaning learning how to edit the work)
Simply enough right? Well not really. It was rather tedious...and I even forgot to document the work (*facepalm*). Seriously I couldn't do a simple task right in the past week...
Step 1
I started with erasing all the parts that I would paint on. As the card was not only damaged but also greasy and dirty I needed to get rid of that somehow as the paint wouldn't adhere to it as I already found out. (I've actually done this early after I bought the card...so people were staring at the partly blanked card for a while...as I played with it)
Step 2
After that I mixed some grey and applied it. This created a solid base coat. I wanted to hide all the 3d scratches and residues from both permanent markers and the dirt. I was partly successful.
Step 3
I decided to use shades of grey to determine the highlights and shadows. For that I used black and white as a starting point and then I used shades of grey to determine the rest. I just used blocks of colors, it wasn't detailed enough I would say...
Step 4
I tried to mix the goddamn yellow. Well, yellow color always shows differently on a screen after it's been scanned or photographed for some reason. Anyway my problem was that the green was always ending up green. So I tried adding pink and orange and well...it came up differently as well. I tried to mix the hues according to the grey ones, but I failed. Maybe I should try this with a color I don't have such problems mixing. Or well start with a basic color I own.
Step 5
I did the rest of the card in similar fashion with similar incapability of doing it right. Something was simply missing...and I couldn't figure out what that is until one artist made a comment about it.
Step 6
Getting rid of the paint at places I did not want it to be. I already learned few things
- one can get rid of the paint by using water and brush or some paper cloth or whatever
- one can get rid of one layer of paint each time
- one can actually scratch the paint off
Not sure how this will be applicable to larger paintings as this probably won't be something I would want to do. Acrylics can simply cover the areas I messed up somehow.
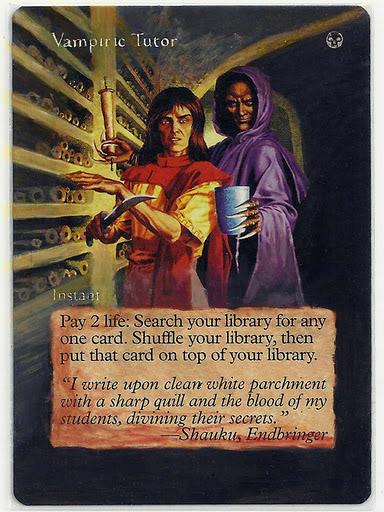
Finished tutor, at least for that day.

After I finished this I posted on mtgsalvation to get some feedback. People know me already even though I'm no expert at doing this and my work does not stand out. I met many artist who consider me aspiring one so in a way this helps me continuing. This means for me that people actually PM me with their input and I find this very useful. Anyway the image above this text is my scanned version and the one below is slightly edited one.
The differences are in highlights and making things even more cohesive and better looking. Few lines actually make it look much better. Good lesson. Now I need to be able to see this as well in drawings/paintings and such. Hopefully more b/w drawings and paintings will help me with that.


0 comments:
Post a Comment